 |  |

The whole point of having a Canvas is to put items in it. You can create arcs, bitmaps, images, lines, rectangles, ovals (circles), polygons, text, and widgets. Each has an associated createXXX method, where the type of item you want to create replaces the XXX. Each of the create methods returns a unique ID, which can be used to refer to the item later. When you see a method that takes a tag or an ID as an argument, the ID is the one returned from the create method.
When you create an arc, you specify a bounding rectangle with two sets of x and y coordinates. The arc is drawn within the confines of the bounding box. The basic createArc statement is as follows:
$id = $canvas->createArc(x1, y1, x2, y2);
Any additional options used with createArc are specified after the coordinates:
$id = $canvas->createArc(x1, y1, x2, y2, option => value);
Each option for the arc item can be used later with the itemcget and itemconfigure Canvas methods. The options are:
Here are some examples of the -extent option:
# This draws half of an oval
$canvas->createArc(0,0,100,150, -extent => 180);
# This will draw 3/4 of an oval
$canvas->createArc(0,0,100,150, -extent => 270);
$canvas->createArc(0,0,10,140,-tags => ["arc", "tall"]);
You don't need to use an anonymous array if you are only specifying one tag name:
$canvas->createArc(0,0,10,140,-tags => "arc");
A Canvas widget can display a bitmap instead of text, just as a Button or Label can. You can use createBitmap to insert a bitmap into your Canvas widget:
$id = $canvas->createBitmap(x, y);
Of course, you must use the -bitmap option to specify which bitmap to display or you won't see anything. So we really create a bitmap like this:
$id = $canvas->createBitmap(x, y, -bitmap => bitmap);
The other options available for createBitmap are:
$canvas->createBitmap(0,0, -bitmap => 'info',
                      -tags => ["info", "bitmap"]);
You don't need to use the list if you are only specifying one tag name:
$canvas->createBitmap(0,0, -bitmap => 'info', -tags => "bitmap");
If we can create a bitmap on a Canvas, it makes sense that we can create an image as well. We can do so with the createImage method:
$id = $canvas->createImage(x, y, -image => image);
Again, you have to specify an image to display or you won't see anything. The other options available for createImage are:
$canvas->createImage(0,0, -image => $imgptr,
                      -tags => ["image", "blue"]);
You don't need the list if you are specifying only one tag name:
$canvas->createImage(0,0, -image => $imgptr, -tags => "image");
The createLine method can actually create multiple connected lines, not just one. The first two coordinate sets you supply create the first line, and any additional coordinates will continue the line to that point:
$id = $canvas->createLine(0,0, 400,400);           # creates one line
$id = $canvas->createLine(0,0, 400,400, -50, 240); # creates two lines
After the coordinates, you can specify any options and values you wish to configure the line(s); the options and values are as follows:
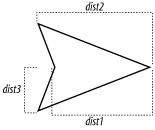
Specify the three distances by using an anonymous list such as this:
$canvas->createLine(10, 10, 200, -40, -arrow => "both",
                    -arrowshape => [ 20, 20, 20]);
Figure 9-4 shows what the distance values mean.

$canvas->createLine(0,0, 100,100, -tags => ["line", "blue"]);
You don't need to use a list if you are specifying only one tag name:
$canvas->createLine(0,0, 100, 100, -tags =>
"line");
An oval can be a circle if you draw it just right. To create a circle or oval, use the createOval method and specify two sets of points that indicate a rectangle (or square) in which to draw the oval. Here is a simple example:
$id = $canvas->createOval(0,0, 50, 50);  # creates a circle
$id = $canvas->createOval(0,0, 50, 100); # creates an oval
The options for the oval will be familiar, so we'll just cover them briefly:
$canvas->createOval(0,0, 100,100, -tags => ["oval", "blue"]);
You don't need to use a list if you are specifying only one tag name:
$canvas->createOval(0,0, 100, 100, -tags => "oval");
A polygon is merely a bunch of lines where the first point is connected to the last point automatically to create an enclosed area. The createPolygon method requires at least three (x, y) coordinate pairs. For instance, the following piece of code will create a three-sided polygon:
$id = $canvas->createPolygon(1000,1000, 850,950, 30,40);
Additional (x, y) coordinate pairs can be specified as well; for example:
$id = $canvas->createPolygon(1000,1000, 850,950, 30,40, 500,500);
The options you can specify with createPolygon are the same as those you use with createLine: -fill, -outline, -smooth, -splinesteps, -stipple, -tags, and -width. Just remember that createPolygon connects the first point to the last point to enclose the area.
As if being able to create a rectangle using createLine or createPolygon weren't enough, we also have the createRectangle method. It only takes two (x, y) coordinate sets, which are the opposite corners of the rectangular area:
$id = $canvas->createRectangle(10, 10, 50, 150);
Again, we have seen the options available for createRectangle with the other create methods: -fill, -outline, -stipple, -tags, and -width. Although we've covered these options already, here are a few examples:
# A blue rectangle with black outline:
$canvas->createRectangle(10,10, 50, 150, -fill => 'blue');
# A blue rectangle with a thicker outline:
$canvas->createRectangle(10,10, 50, 150, -fill => 'blue', -width => 10);
Finally, an item type that doesn't have lines in it! You can use the createText method to add text to a Canvas widget. It requires an (x, y) coordinate pair, which determines where you place the text in the Canvas and the text to be displayed:
$id = $canvas->createText(0,0, -text => "origin");
The -text option is actually optional, but then you wouldn't see any text on the screen. Because there is no point in that, we will assume that you will always specify -text with a text value to display. The other options available for text items are as follows:
The following options, discussed earlier, work the same as they would for an Entry widget or a Text widget: -insertbackground, -insertborderwidth, -insertofftime, -insertontime, -insertwidth, -selectbackground,-selectborderwidth, and-selectforeground. See Chapter 5, "Label and Entry Widgets" and Chapter 8, "The Text, TextUndo,and ROText Widgets" for more details.
Methods that affect text items will sometimes ask for an index value. Text indexes for the regular Text widget were covered in Chapter 8, "The Text, TextUndo,and ROText Widgets", and the index values for a Canvas text item are similar. The only difference is that each item is considered only one line (even if it has "\n" characters in it). Index values are as follows:
To delete characters from within a text item, use the dchars method: $canvas->dchars(tag/id, first [, last ]). Specify a tag or ID to match the text item(s) and the index at which to start deleting. If the end index isn't specified, all the characters to the end of the string will be deleted (including any "\n" characters).
To specifically place the blinking text cursor, use the icursor method : $canvas->icursor(tag/id, index). The cursor will only show up immediately if the specified item has the current keyboard focus. You can still set the position of the cursor if it doesn't, it just won't display until the item does get the keyboard focus.
To find an index based on another index, use the index method. Here's an example:
$index = $canvas->index("textitem", "sel.first");This returns the numerical index associated with the first selected character in the text item. If more than one item matches the tag or ID indicated (in this case, it's a tag named "textitem"), then the first one found is used.
To add more text to a text item, use the insert method: $canvas->insert(tag/id, index, string). The first argument is the tag or ID, which can match multiple items. The second argument is the index before which to insert the new string, and the last argument is the actual string to insert into the text item.
There are several methods you can use to programmatically select portions of the text. To clear the selection (any selection; there are no tags or IDs sent with this command), use $canvas->selectClear. To select a portion of text, use selectFrom and selectTo. The following two lines of code select the text from beginning to end for the first item that matches the tag "texttag":
$canvas->selectFrom("texttag", 0);
$canvas->selectTo("texttag", "end");
You can use the selectAdjust method to add to the selection: $canvas->selectAdjust("adjust", tag/id, index). To get the ID of the item that currently has the selection in it, use $id = $canvas->selectItem.
You can put any type of widget inside a Canvas—Buttons, Checkbuttons, Text widgets, or even another Canvas widget (if you are a little crazy)—by using the createWindow method. Before calling createWindow, you must create the widget to put into the Canvas. Here's an example:
$bttn = $canvas->Button(-text => "Button",
                        -command => sub { print "Button in Canvas\n"; });
$id = $canvas->createWindow(0, 0, -window => $bttn);
There are a few things you should note about this example (which is fairly typical, except the subroutine associated with the Button doesn't do anything useful):
The Button is a child of the Canvas widget. The Button could be a child of an ancestor of the Canvas (the Button could be a child of the MainWindow if the Canvas is also a child of the MainWindow). However, the Button should not be a child of a different Toplevel widget that has nothing to with the Canvas.
The createWindow method doesn't actually create the widget; it just puts it in the Canvas. The Button is placed at the specified coordinates inside the Canvas and has not been placed on the screen with pack, grid, or place.
The widget must be created before you call createWindow.
You can click the Button and the callback associated with it will be invoked, just as with any other Button.
When you create the widget, you can use any of that widget's options to configure it. To continue configuring the widget, use the reference to it (e.g., $bttn).
The following options, which you can use when you call createWindow, are more like options you use with pack than widget options:
$canvas->createWindow(0,0, -window => $canvas->Button(-text => "Button",
         -command => sub { print "Button!\"; }));
It makes sense to create the widget inline if you don't need to do anything fancy with it.
Perl/Tk has an experimental grid item type that displays dotted, dashed, or solid lines, in both the x and y dimensions. The effect is reminiscent of old-fashioned graph paper.
Grid items cover the entire Canvas, but never enclose or overlap any area and are not near any point, so you cannot search for them using the closest, enclosed, or overlapping attributes. In most other regards, they behave like other Canvas item types. Currently, grids, like window items, do not appear in PostScript output.
Grid items are created like this:
$canvas->createGrid(x1, y1, x2, y2, ... );
x1 and y1 specify the origin of the basal grid cell, and x2 and y2 specify its width and height, respectively; the cell is replicated over the entire surface of the Canvas widget. By default, dots are drawn at every grid intersection, unless the -lines option is set true. When drawing lines, dash specifications are honored.
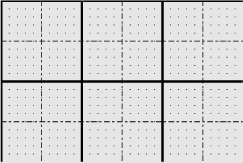
This code generated Figure 9-5:
my $c = $mw->Canvas(qw/-width 300 -height 200/)->grid;
$c->configure("-scrollregion" => [0,0, 300, 200]);

$c->createGrid(0, 0, 10, 10);
$c->createGrid(0, 0, 50, 50, -lines => 1, -dash => '-.');
$c->createGrid(0, 0, 100, 100, -width => 3, -lines => 1);
One important note: grid items remain invisible unless a scroll region is defined. This may be construed as a bug, which is one reason why grids are deemed experimental.

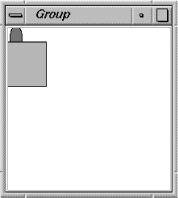
Perl/Tk sports a new Canvas item called a group. A group item is actually a collection of standard Canvas items that can be manipulated simultaneously. The following code creates an oval and a rectangle, then groups them together:
$one = $canvas->createOval(5,  0, 20, 30, -fill => 'blue');
$two = $canvas->createRectangle(0, 20, 50, 75, -fill => 'red');
$group = $canvas->createGroup([0, 0], -members => [$one, $two]);
$mw->update;
$mw->after(1000);
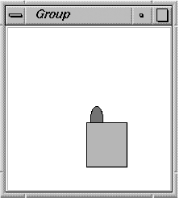
$canvas->move($group, 100, 100);
Figure 9-6 shows the outcome.

After a one-second delay, the group is moved to a new Canvas coordinate, shown in Figure 9-7.

Of course, sometimes you want to get to individual items within the group, perhaps to configure a special attribute. The current idiom is to iterate through the members of the group, like this:
foreach my $member ($canvas->itemcget($group, -members)) {
    print "member=$member\n";
}
This example prints out the item ID for each member of the group, but you can use the item IDs in an itemconfigure call.

Copyright © 2002 O'Reilly & Associates. All rights reserved.